Thanks for stopping by! This is my corner of the blogosphere where I'm keeping track of
styles/techniques/products, lessons learned, my to-do list, and favourite links.
Feel free to offer any comments, feedback, or advice - I'm learning as I go !


Showing posts with label protective styles. Show all posts

Tuesday, April 8, 2014

Update!!

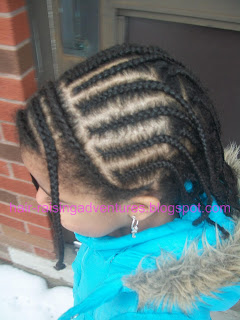
Well, since getting a little press at Today.Com my long-forgotten blog has been coaxed into a (quick) update. Where did we leave off? Oh yes, it was fall 2012. What can I say? Life has been very busy. JJ continues to love having her hair in protective styles that we leave in for 2-4 weeks. Lately she has been asking for cornrows, and I have been getting braver/more creative with designs/patterns. Here is her current style:


I am not making any promises, but I am feeling re-inspired to share....so maybe I'll be back without letting a year or so slip by. Next stop - the long forgotten Facebook page :)


Monday, July 2, 2012

Happy Canada Day!

Quickest post ever - just to say Happy Canada Day!
Canada Day Hair!!
JJ started with a 2-week old (and oops! not blogged-about) style with cornrows up and to the side on each side, and box braids in the middle.


The ((fuzzy)) side braids were pulled into flat two-strand twists, and the ((fuzzy)) middle box braids were pulled into piggy-back ponytails with red and white Pony-O's.
Chasing the Canada Day Cake at the parade!
Now we are getting ready for the Baby Big Hair Frotective Challenge so JJ's Canada Day Hair is on it's way out!

We are so looking forward to 4 days of BIG hair.....!

Wednesday, March 21, 2012

The February Protective Style - Cornrows and Box Braids

Slowly but surely...I'm catching up!

February's protective style was cornrows and box braids. This lasted the whole month.

Although I neglected to take step-by step photos, I'll go through the steps. 

1) I made a headband of three cornrows across the front, alternating which side I started on. 

3 cornrows in the front
last headband cornrow started further back, for variety
2) I then braided 8 cornrows heading straight back, ending in single braids, as you can see in the photo above.

3) I put the back of JJ's hair into single box braids.   

box braids at the back
better idea of braid length
The parting pattern of the box braids was staggered to make part lines less visible. I did have to make two boxes much bigger than the others, as you can see in the photo below. This is because I was still trying to hide the chunk of hair that JJ cut off the month before. Luckily, the four braids that I am holding up in the photo below covered the two larger parted areas so it didn't look too "off". 

These are the two larger braids. The circles indicate the length of the hair that she cut off.

As you can see, the larger boxes (and the cut-off hair!) were well-camouflaged by the braids that laid on top of them.


We tried to remember to cover up at night as much as possible.
For school, JJ usually started the day with her hair tied back, but she loves her hair down in braids so mostly it was down.

We gently washed her scalp and braids once a week, with a few co-washes thrown in the mix too. We refreshed/moisturized with diluted Taliah Waajid Protective Mist Bodifer or a home-made cocoa butter, coconut oil and almond oil mixture.


This ended up being a great long term protective style that was visually interesting and lasted well. JJ's cut-off chunk of hair is really growing and she even wore her hair OUT for the first time in months (next post!).

Monday, March 12, 2012

A Month of Yarn Twists

Hi everyone!! First, I'd like to thank you for your patience as I try to balance family/work/life/blog. Blogging has certainly taken the back-burner, but I do have a line-up of exciting hair stories to tell. Slowly but surely, I'll get them out!

I wanted to start by sharing how JJ's sparkly twists for New Year's Eve ended up becoming a longer-term protective style.

When I started the yarn twists, I figured I would leave them in for a few days post-NYE. I wasn't planning on leaving them in too long, because I figured they'd be a bit too "flashy" for everyday. But as you may remember, JJ cut off a big chunk of her own hair on NYE, while I was taking a break from finishing up the twists...

So I decided the yarn twists would stay in a bit longer to buy some time (hair growth time!) before figuring out how to camouflage the short hair in her next style.

Luckily, the sparkly-ness of the yarn twists was quite subtle. The subtle but sparkly twists stayed for all of January! I washed them as per Rory's detailed instructions about washing yarn extensions at Chocolate Hair Vanilla Care. I also spritzed frequently with diluted Taliah Waajid Protective Mist Bodifier or live clean Exotic Nectar Argan Oil leave-in spray.

Here are JJ's yarn twists, not too fancy for the mall!

The beads stayed in for about a week.
Once the beads were out, I knotted the ends.
After about three weeks, I could not take the fuzz at the front anymore! The front yarn twists came out, and I did five simple flat twists towards the back. The back yarn twists stayed in.

Too much fuzz!
Flat twists at the front
After 4 1/2 weeks, I undid the knotted ends. The twists were super easy to unravel and the yarn actually seemed to help keep the two strands of the rope twists very distinct. There was no tangling of the two strands together as I unravelled the rope twists; usually JJ's hair does tangle with long-term 2-strand twists.


I left them as a yarn + hair twist-out for a day (sorry, forgot to take a photo of her whole head!). 

The next day I took out the yarn, by simply sliding it off of JJ's hair. Again, I was surprised at how non-tangled JJ's hair was, at how easy it was to simply untwist the strands, and at how moisturized her hair had stayed. 

And the patch of cut-off hair gained some length! 

JJ's hair went straight into another protective style - cornrows and box braids - for the month of February. Hopefully I'll catch up on blogging about February's style before too long - but here's a sneak peak in the meantime...


Monday, June 6, 2011

Protective Style Challenge Weeks 3 and 4

Have I mentioned that work is crazy for me? I work in Education, meaning that I am crazy busy in June, but will be able to relax a little over July and August. Since it's still June this update will be short and sweet.

JJ's hair for week 3 of the Protective Styling Challenge entailed taking out the back braids (from Week 2's cornrows into a mohawk with twists) and making plain old small (not quite mini) twists. I left the front the same:


For week 4 everything came out and I made cornrows at the front and small box braids at the back. Because the cornrows were thicker I split each one into three small hanging braids.

I hope to keep these braids for a while... I have been VERY good at following all the styling challenge rules (no rubber bands, no barrettes, no snaps, no BEADS).  But when this is over, I plan to add some of those beads I bought waaaaaaay back in Week 1!!

Saturday, May 28, 2011

Protective Style Challenge Week 2

....I'm way late on posting here, but this is what I did for Week two of the Beads Braids & Beyond one month protective styling challenge.


At the front I did some fairly small - but not quite mini twists. JJ likes them to fall over her face like long bangs.

I cornrowed the sides and did twists at the back in a mohawk style. I struggled a bit to bring the hair from the side cornrows together into the twists because I didn't want to use any elastic bands as I normally would when doing a style like this.  So for each twist I took a section of hair from each side. This worked well, but I had to really concentrate when I was doing it (oh well, less Shrek for me).

When we went out, I gathered the bangs back with some twisty rope and incorporated these into a ponytail with the twists at the back (bottom right).

These have held up very well for the week. The twists at the back became twist-outs for Friday and Saturday. After swimming lessons (today) I planned to wash JJ's hair and restyle in small twists for the last two weeks of the protective styling challenge. However, plans changed - more on that to come in another post....


Wednesday, May 18, 2011

Protective Style Challenge

As many of you probably know already, Beads, Braids & Beyond is doing their one month protective styling challenge on Facebook.

I watched from the sidelines last year; it was just around the time that I started spending (a lot of) time on the internet looking at and thinking about hair. Anyway, I decided to take the plunge and join the challenge this year.

For this week I tried flat rope twists. They were a little tricky at first but went better once I got my head around which direction(s) to twist. I was originally inspired by this post at Chocolate Hair / Vanilla Care and flat twists have been on my To Do List for a while.

Of course my (cheap) camera died so I only had my cell phone to take photos, but here is my week one check-in "collage":

So far they are holding up quite well.

In other news I got a huge container of pre-sorted beads at Walmart for $15.00 (approx 2300 beads!!!). Of course I am dying to use them but that would be breaking the protective styling challenge rules so I'll have to wait. Look at them!!!


In the meantime though, JJ could make about 1000 necklaces...

Thursday, February 24, 2011

99 (give or take) freestyle twists


JJ's last style (cornrows and box braids) stayed in longer than expected due to other life events, so her hair has had a bit of a styling break. A good thing, but I was eager to take on something ambitious this weekend.

I started with clean hair, slightly stretched from a night in banded ponytails. The complete style evolved over a few hair sessions over the weekend. This is how I did it:

1.  Starting at the back, I gathered a small section of hair, spritzed with water and a little detangler, and finger detangled (her hair was thoroughly detangled before putting the banded ponytails in so this wasn't difficult). I made two-strand twists that were smaller than usual - about 1/2 cm in diameter (about 1/5 inch). I continued, 1 small section at a time until the back was done. There were about 75 total twists in the back. I used a lovely shea/aloe/coconut oil mix that I made using a recipe from Naturally Leslie (see this post.)

2. I thought about continuing with regular two strand twists for the front of her hair but:
a) I wanted her hair to be out of her face without needing barrettes or elastics, and
b) I'm a little artsy and felt like departing from straight parts.

So I did curved flat two-strand twists kind of all over the place with my main goal being to keep her hair out of her face.
Started the flat twists at the front, but took a
break by adding in a knotted ponytail 
Later continuing the flat twists in the front
(same PJs, different day)

Look! JJ's dressed!!
(but see PJs in background?)
All done!
In the end, I feel okay with it, but think that cornrows would have looked much neater and less fuzzy than the flat twists at the front. I may take them out and re-do with cornrows.
Later in the week -pigtails
The flat twists are getting pretty fuzzy (day 4).

Tools: water, detangler, comb, shea/aloe/coconut oil mix (see link, above)

Monday, January 31, 2011

Protected Ends in Twists

Started with banded ponytails
This week's style was a bit of a mishmash that evolved from the weekend's banded ponytails. I started with dry hair, stretched from banding. I spritzed the two back sections and twisted them. Initially I tried to do "sister twists" but they kept unravelling. I must have been doing something wrong?!?!? So I just went ahead and did my usual, non-sister twists. 

See the curved cornrows?
Not really? Sorry - still working
on photography skills
Once the back was done my plan was to cornrow the top two ponytailed sections. I started by cornrowing the hairline as I often do. Then I got kind of creative. I cornrowed down the hairline and then curved the cornrow upwards. I cornrowed a section down from the middle part to meet it, attached the two cornrows with a pink ouchless, and twisted the ends. I planned to continue some kind of creative cornrowing but we were both tired so I banded pigtails and braided them with a barrette at the bottom. JJ loved the pigtail look and I loved that her hairline and the back of her hair were taken care of (these are the two areas most prone to fuzziness and tangles). 

Protected ends!!!

I've been doing a lot of blog-hopping and **somewhere** (I just can't remember where....) I came across the idea of keeping the ends of twists protected by tucking them into a big twist or loose bun, JJ's hair is not quite long enough for that but I did put the twists together into a loose ponytail (still using strips from that old pair of tights) and tucked the ends under.


Her hair looked great this morning for school, but I still think I might add in a few cornrows - stay tuned!

Friday, December 31, 2010

The Usual Routine

Our hair routine varies somewhat from week to week, but here is the "usual":

1) Take out whatever style was in (usually done the night before).

2)  Wash hair. Usually this is a "co-wash" (wash with conditioner only). If there is a lot of product buildup I'll do a baking soda rinse (baking soda dissolved in warm water). Every two weeks or so I use a no-sulfate shampoo. Currently, we're using a very affordable line called "live clean". I like the Apple Cider "clarifying" shampoo. I usually wash JJ's hair in two sections as it is very thick.
Usually I wash JJ's hair in two sections - back and front.
3) Condition. I usually apply conditioner and let it sit for a while while JJ plays in the bath. We like the live clean Argan Oil conditioner. Sometimes I mix a little jojoba oil into the conditioner and let it sit.
Sitting with conditioner.
Jojoba oil, and live clean shampoo & conditioner
 (sorry - focus problem)
4) Detangle. Usually I comb JJ's hair in the bath with a wide tooth comb. I comb it in smallish sections, starting at the ends.

5) Rinse.
Clean hair!
6) Apply product and style. Typically, I lean towards "protective styles", like two-strand twists. I try to style so that I can change it up during the week by adding/changing hair accessories. Usually I add some almond oil to a tub of organic shea butter and mix it around with my fingers until I get a smooth, creamy consistency. I then divide the hair into sections, add the shea/almond "cream", comb through, and twist, making sure to twist right to the ends. I have a bottle of water to spritz as JJ's hair dries quickly. Usually I'll wrap the ends of the twists around a barrette a few times and secure. This helps the ends curl up nicely instead of getting frizzy. It also helps "pull down" the twists for some length. I take the barrettes out once the hair is dry.

I start with the back as JJ's scalp is most sensitive there.
Note length of the combed out section. 
First twist.
Back row of twists, second section ready to go.
Barrettes added to stretch the twists and keep the ends neat.
Two rows done!
Three rows done, added some flat twists for variety
and to keep JJ's hair out of her face.
More flat twists and a flat twist to the side at the front.
Added some baubles - done!
From the top.
Twists can usually last the week easily. JJ does sleep with a satin cap at night. Sometimes towards the end of the week we do twist-out. If I can keep this momentum up, I'll post a pic!


Addendum: Katie's post on Happy Girl Hair called The Care and Feeding of Protective Twists reminded me that a daily spritz is a very good thing for twists (or any style for that matter). I've been trying to remember to spritz JJ's twists daily. I've been using a homemade mixture of live clean Argan oil smooth and shine cream, a little almond oil, and water. I just shook these together in a small spray bottle. So far, so good....